5 -
Signal Settings
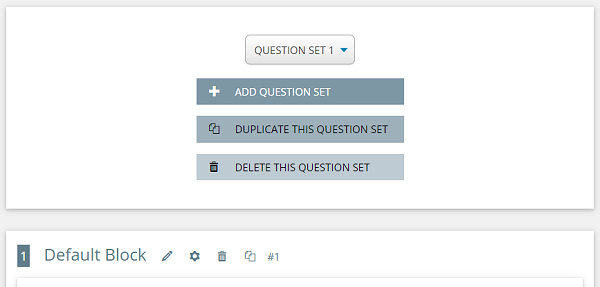
Once you have created your question sets, you can then create your ESM signals on the PROJECT SETTINGS page. The method of setting the signals varies depending on the type of ESM.
The following is a step-by-step explanation.
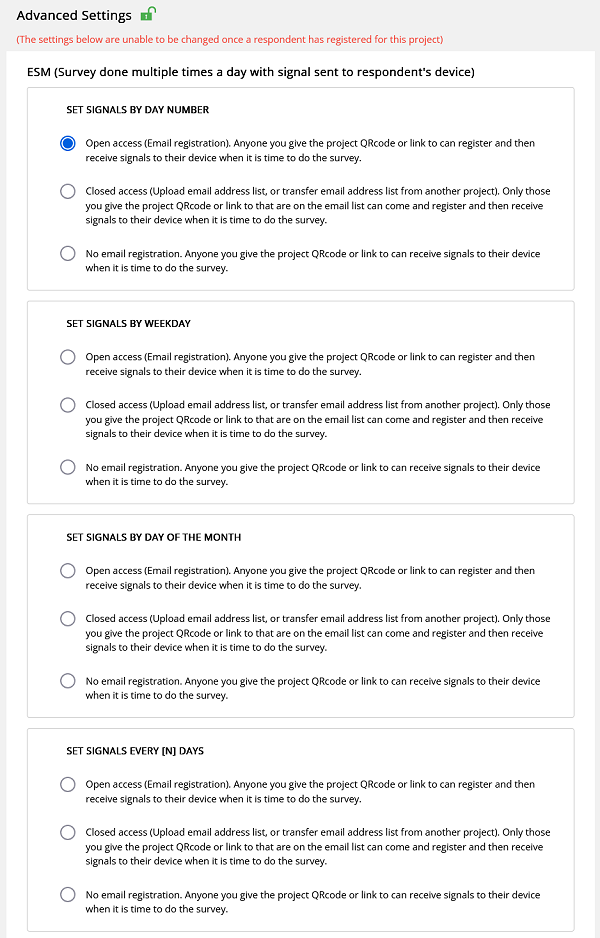
SET SIGNALS BY DAY NUMBER
In the [SET SIGNALS BY DAY NUMBER] ESM, for each signal, the date (DAY#), send time, and question set number needs to be set.
Before setting the signals, carefully plan a research schedule.
Referring to the chart below, make a diagram that reflects the research schedule that you have planned.
Tips for creating your research schedule.
-
The signal numbers (signal 1, 2, 3...) are arranged in the same order as they are sent.
-
Set the date (DAY#), send time, and question set number for each signal.
-
It is acceptable to have DAY# with no signal. Refer to: [DAY 3] in the diagram below.
-
The send time (Time 1, 2, 3...) does not need to be in the same order as they will be sent.
-
You can set signals to be sent at fixed times. (Refer to: [Time 1], [Time 3] shown in red on the diagram below.)
-
Multiple signals set to be sent at random times can be set up within the same day. (Refer to: [Time 2] shown in blue on the diagram below.)
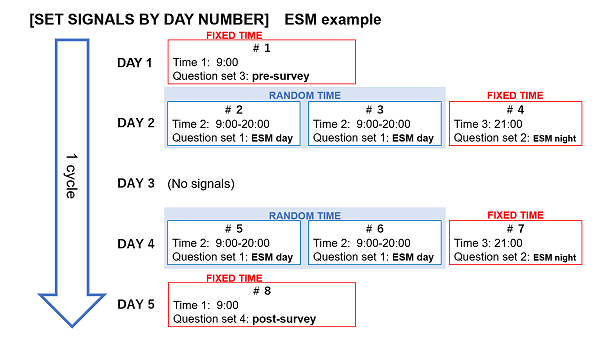
Please pay particular attention to the timing of when the first signal will be sent.
-
If the SIGNAL START DATE is set, the start date for sending the signals is calculated from DAY 1; if a signal is set for DAY 1, all respondents will receive their first signal on the SIGNAL START DATE.
-
If the SIGNAL START DATE is not set, DAY 1 is the day after the respondent has completed their registration. If a signal is set for DAY 1, each respondent will receive their first signal the day after they complete their registration.
-
If no signal is set for DAY 1 and the first signal is set for DAY 2 or later, the day after the SIGNAL START DATE / REGISTRATION COMPLETED DATE is counted as DAY 1, and the first signal will be sent when the first set DAY number is reached.
Example: Signal #1 set to DAY 1
If SIGNAL START DATE is set to 1st of January, the first signal will be sent on the 1st of January.
If SIGNAL START DATE is not set, and respondent completed registration on 1st of January, the first signal would be sent the day after registration on the 2nd of January.
Once you have finished planning your research schedule, you can begin to set the signals in accordance with the plan.
-
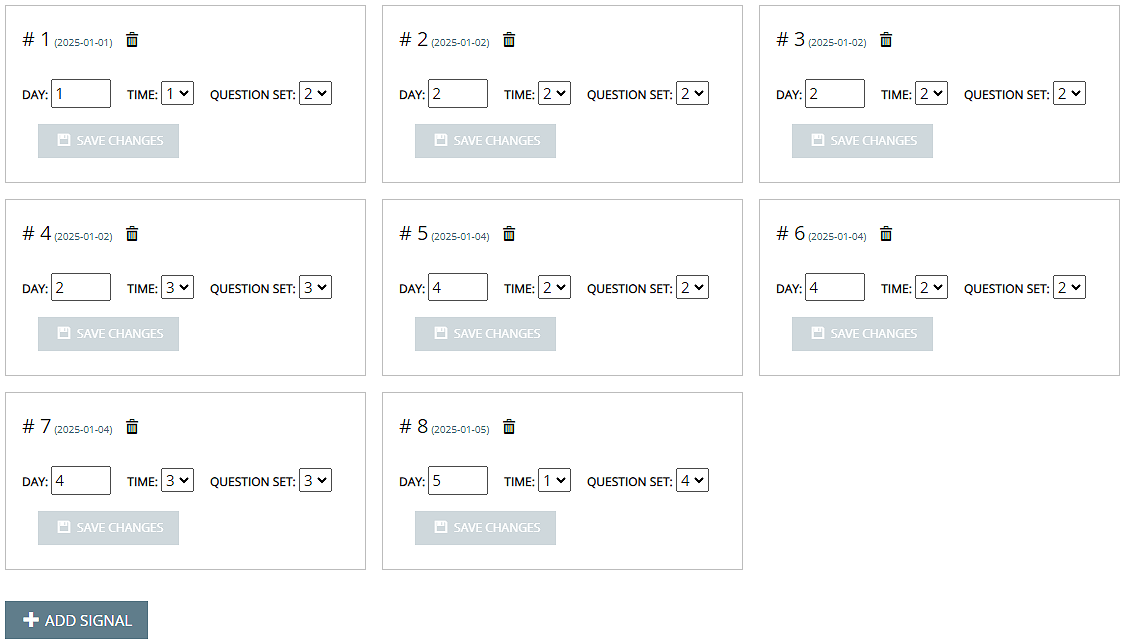
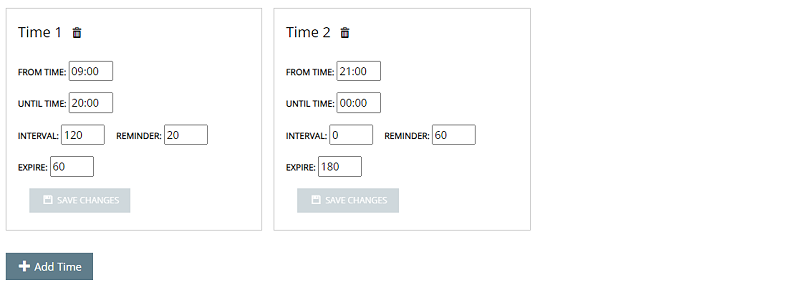
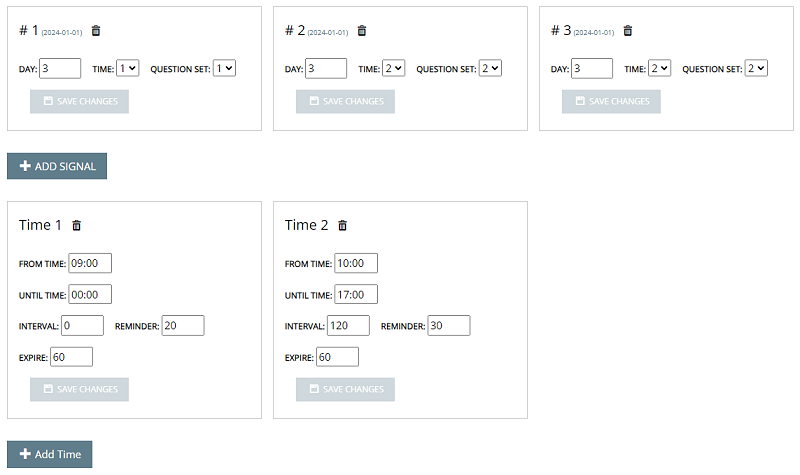
Firstly, create the sending times.
Create the required number of sending times in accordance with your research plan.
The diagram below shows the send times created in accordance with the schedule in the [SET SIGNALS BY DAY NUMBER] ESM example diagram shown above.
-
A FIXED TIME signal is created by only setting a time value in the FROM TIME field (UNTIL TIME: 00:00). Refer to: [Time 1] and [Time 3] in the diagram below.
-
Setting both a FROM TIME and an UNTIL TIME value will create a RANDOM TIME signal between the FROM TIME and UNTIL TIME. Refer to: [Time 2] in the diagram below.
-
If multiple signals are set to use the same RANDOM TIME setting, the INTERVAL value represents the minimum time that must elapse between any two times randomly created (between the FROM TIME and UNTIL TIME). The INTERVAL time is ignored if only one signal is set to use the RANDOM TIME, so in this case for clarity setting the INTERVAL to zero is advised.
-
The REMINDER and EXPIRE field can be set for both a FIXED TIME and RANDOM TIME.
-
REMINDER: A second signal can be sent to respondents who have not yet accessed the survey URL a designated amount of time after the first signal is sent. This is called a REMINDER. The content of this REMINDER message is exactly the same as the first signal sent. THE REMINDER setting can be used to prevent respondents from forgetting to respond, and can effectively increase the response rate.
-
EXPIRE: Access to the survey questions shown when a respondent clicks the signal URL can be blocked after a set period of time from when the first signal was sent (not the REMINDER signal). For example, if you set the EXPIRE time to 30 and the first signal is sent at 9:05, the respondent will have until 9:35 to access the URL in the message and start answering. After that time, it will expire and the survey questions will not be displayed. Instead the text set in the BASIC SETTINGS section EXPIRED SURVEY field will be displayed. (example: Sorry, this survey link has expired).

-
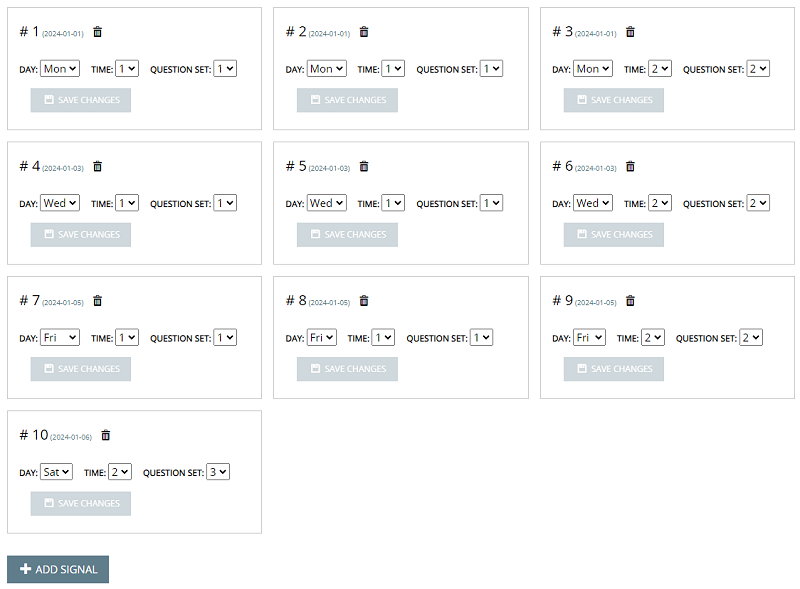
Next, create the signals.
Create and edit the settings for the required number of signals in accordance with your research plan.
-
Prior to creating these signals, the required number of question sets need to be created on the [Edit Project] page.
-
It is recommended to complete the settings in each signal before creating the next one. For example, complete the settings of #1 as in the below diagram and then after clicking the [SAVE CHANGES] button, create #2 signal by clicking the [ADD SIGNAL] button. Keep adding signals in the order of ADD - EDIT SETTINGS - SAVE. If you just add all the signals first and then return to #1 to edit the settings, error messages will begin to appear in relation to the signal time being earlier than the previous signal and this will cause the order of the signal numbers to be wrong.
-
If other errors occcur, the signal that is causing the error will be displayed in one of the following colors. RED: The timing settings are too strict. You can fix this by decreasing the number of signals, or by decreasing the interval between signals. You can also adjust the time window in order to increase the length of time between the from time and until time. BLUE: The random time span overlaps with another random time span on the same day. GREEN: There are two identical fixed times on the same day.
-
When you are adding and editing your signals it is recommended that you set a [SIGNAL START DATE] in the Advanced Settings section. By doing this, the date the signal will be sent is displayed, which makes it easier to check if the timing that the signal should be sent is correct or not. If you do not require a [SIGNAL START DATE] for your project, then delete the [SIGNAL START DATE] once you have finished creating all of your signals.
-
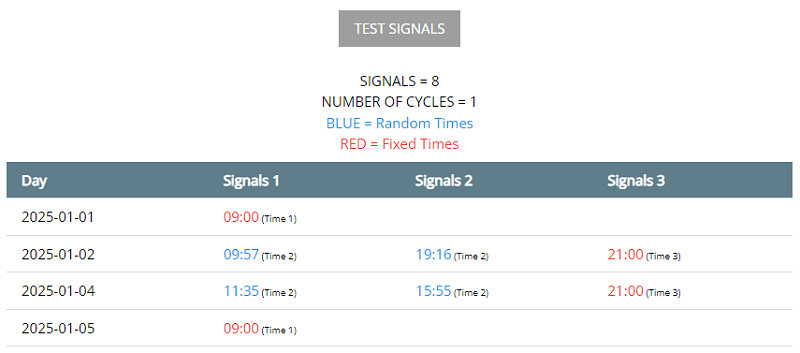
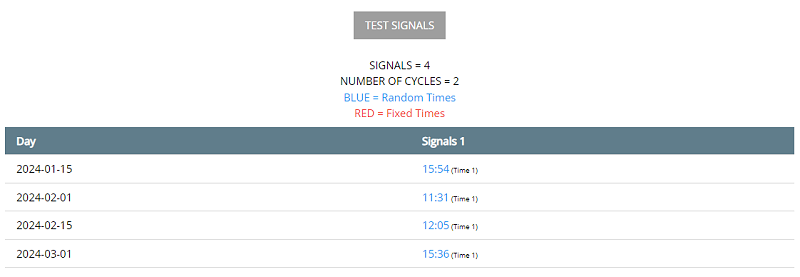
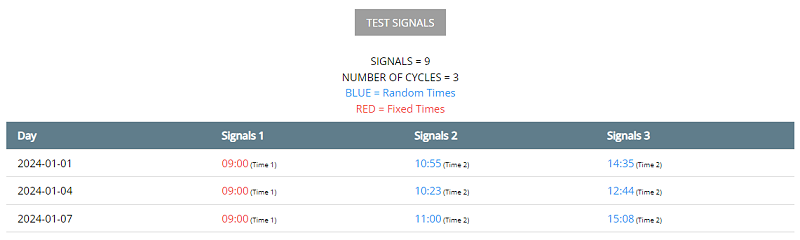
Finally, click the TEST SIGNALS button to check your signals.
Once you have set all your signals, it is time to check if they match the research plan you created.
Click the TEST SIGNALS button located directly beneath the section where you made your times and signals. Signal times for each day will be displayed in accordance with the settings you created.
-
Signals shown in red are fixed time signals.
-
Signals shown in blue are random time signals. The time of the random signals will change each time you click the TEST SIGNALS button. Press the button several times to check that the random distribution is as you expected.
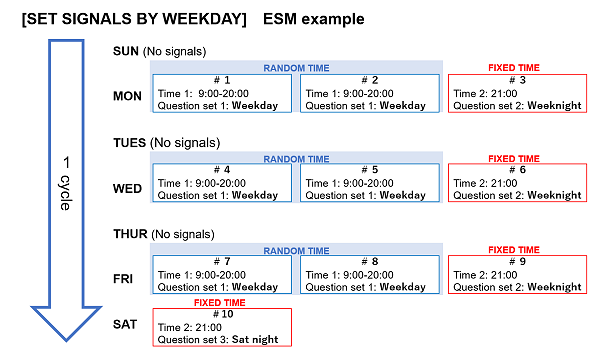
SET SIGNALS BY WEEKDAY
In the [SET SIGNALS BY WEEKDAY] ESM, for each signal, the day of the week, send time, and question set number needs to be set.
Before setting the signals, carefully plan a research schedule.
Referring to the chart below, make a diagram that reflects the research schedule that you have planned.
Tips for creating your research schedule.
-
Make a schedule diagram starting from Sunday when using [SET SIGNALS BY WEEKDAY]. This is because in the signal setting section, the system is designed so that the week starts from Sunday.
-
Even if you want to start sending signals from a day other than Sunday (example: Sending in the following order, Mon, Tues, Wed, Thur, Fri, Sat, Sun), you set a weeks worth of signals in the signal setting section starting from Sunday. Then if you set the [SIGNAL START DATE] to a date that is a Monday, a week worth of signals will be sent starting from Monday (Send order: Mon, Tues, Wed, Thur, Fri, Sat, Sun).
-
Other scheduling tips are the same as those described in the [SET SIGNALS BY DAY NUMBER] section.
Please pay particular attention to the timing of when the first signal will be sent.
-
If the [SIGNAL START DATE] is set, all respondents will receive their first signal on the first weekday that has a signal set on or after the [SIGNAL START DATE].
-
If the [SIGNAL START DATE] is not set, each respondent will receive their first signal on the first weekday that has a signal set on or after the day after they complete their registration.
Example: Signal #1 set to Sunday
If the [SIGNAL START DATE] is set to 1st of January 2024, the first signal will be sent on Monday the 1st of January and the next signal will be sent on Wednesday the 3rd of January. If the [SIGNAL START DATE] is not set and the respondent registers on Monday the 1st of January 2024, the first signal will be sent on the first weekday that has a signal set on or after the 2nd of January 2024 (Wednesday 3rd of January).
Once you have finished planning your research schedule, you can begin to set the signals in accordance with the plan.
-
Firstly, create the sending times.
Create the required number of sending times in accordance with your research plan.
-
For an explanation on how to do this please refer to the [SET SIGNALS BY DAY NUMBER] section.
-
Next, create the signals.
The diagram below shows the send times created in accordance with the schedule in the [SET SIGNALS BY WEEKDAY] ESM example diagram shown above.
-
Question set 1 is intended for weekday use, question set 2 for weeknight use and question set 3 for Saturday evening.
-
#1, 2 and 3 are assigned on Monday, #4, 5 and 6 on Wednesday, #7, 8 and 9 on Friday, and #10 on Saturday.
-
This represents the case where the [SIGNAL START DATE] is set for Monday, January 1, 2024. To the right of the # number, the date and time the signal will be sent is displayed in green letters.
-
Finally, click the TEST SIGNALS button to check your signals.
Once you have set all your signals, it is time to check if they match the research plan you created.
-
For an explanation on how to do this please refer to the [SET SIGNALS BY DAY NUMBER] section.

SET SIGNALS BY DAY OF THE MONTH
In the [SET SIGNALS BY DAY OF THE MONTH] ESM, for each signal, the day of the week, send time, and question set number needs to be set.
Before setting the signals, carefully plan a research schedule.
The procedure for making a schedule diagram is mostly the same as for [SET SIGNALS BY WEEKDAY] however, instead of a weekly cycle a monthly cycle is made.
Tips for creating your research schedule.
-
Make a schedule diagram starting from the 1st when using [SET SIGNALS BY DAY OF THE MONTH]. This is because in the signal setting section, the system is designed to start from the 1st of the month.
-
Even if you want to start sending signals on a date other than the 1st of the month (Example: First signal sent on the 15th and then signals after that are sent on the 1st and 15th each month), in the signal settings you set the first signal date to the 1st of the month. Then set the [SIGNAL START DATE] to the date you want the signals to start being sent from (Example: 15th).
-
Other scheduling tips are the same as those described in the [SET SIGNALS BY DAY NUMBER] section.
Finally, click the TEST SIGNALS button to check your signals.
Once you have set all your signals, it is time to check if they match the research plan you created.
-
For an explanation on how to do this please refer to the [SET SIGNALS BY DAY NUMBER] section.
SET SIGNALS EVERY [N] DAYS
In the [SET SIGNALS EVERY [N] DAYS] ESM, for each signal, the number of days cycle to wait in between signals, send time, and question set number needs to be set.
Before setting the signals, carefully plan a research schedule.
Referring to the chart below, make a diagram that reflects the research schedule that you have planned.
Tips for creating your research schedule.
-
Every signal has the same day number [N] in a [SET SIGNALS EVERY [N] DAYS] ESM. You are unable to send signals on days between the number of days [N] you set. If you set the day number to 1, then the signals you set will be sent every day.
-
Set the NUMBER OF CYCLES setting in the advanced settings section to [2] or more. (If set to [0], the cycle repeats indefinitely.)
-
In the [SET SIGNALS EVERY [N] DAYS] ESM, a signal is sent on the [SIGNAL START DATE] and then the following signals are sent on a cycle that counts [n] days from the day after each signal is sent.
-
If you do not want a signal to be sent on the [SIGNAL START DATE] of your schedule, then use [SET SIGNALS BY DAY NUMBER] instead and do not set a signal to be sent on the first day.
-
Other scheduling tips are the same as those described in the [SET SIGNALS BY DAY NUMBER] section.
![SET SIGNALS EVERY [N] DAYS](https://psychexp.com/img/esm5-10-en.png)
Please pay particular attention to the timing of when the first signal will be sent.
-
If the [SIGNAL START DATE] is set, all respondents will receive the cycle 1 signal on the [SIGNAL START DATE]. The count for the next cycle begins on the next day and the signal is sent [N] days later. This repeats for as many cycles as is set.
-
If the [SIGNAL START DATE] is not set, each respondent will receive the cycle 1 signal on the day after they complete registration. The count for the next cycle begins on the next day and the signal is sent [N] days later. This repeats for as many cycles as is set.
Example: If set to N=3
If the [SIGNAL START DATE] is set to 1st of January 2024, the first set of signals (one or more signals sent during the same day) will be sent on January 1st. The next set of signals will be sent three days later, on January 4th.
If the [SIGNAL START DATE] is not set and the respondent completes registration on 1st of January 2024, the first set of signals will be sent on January 2nd. The next set of signals will be sent three days later, on January 5th.
Once you have finished planning your research schedule, you can begin to set the signals in accordance with the plan.
-
Firstly, create the sending times.
Create the required number of sending times in accordance with your research plan.
-
For an explanation on how to do this please refer to the [SET SIGNALS BY DAY NUMBER] section.
-
Next, create the signals.
The diagram below shows the send times created in accordance with the schedule in the [SET SIGNALS EVERY [N] DAYS] ESM example diagram shown above.
-
Question set 1 is used for the morning ESM and question set 2 for the day ESM.
-
Signals 1, 2, and 3 are assigned to DAY 3.
-
This represents the case where the [SIGNAL START DATE] is set to January 1, 2024. To the right of the # number, the date the signal is sent is displayed in green letters.
-
Finally, click the TEST SIGNALS button to check your signals.
Once you have set all your signals, it is time to check if they match the research plan you created.
-
For an explanation on how to do this please refer to the [SET SIGNALS BY DAY NUMBER] section.
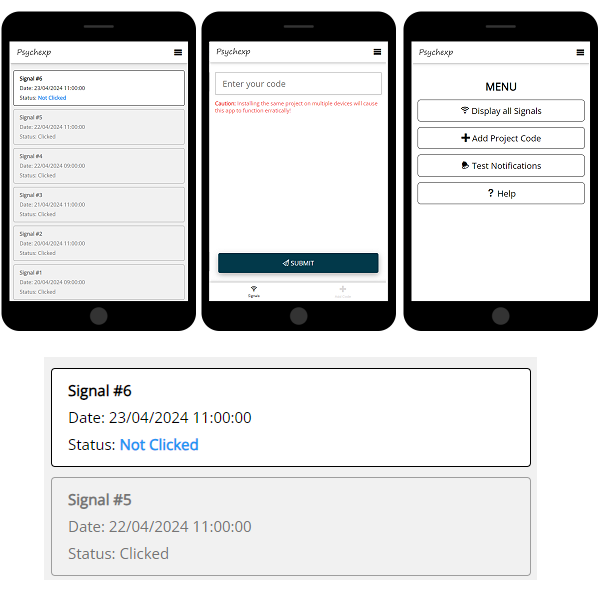
 If you would like to install the Psychexp PWA and send a test notification to your device, firstly open this page on your mobile device and then click the following link to install the pwa.