English

日本語

PSYCHEXP
TUTORIAL

Build an advanced IAT (Implicit Association Test). Fully Customizable
Build an advanced IAT (Implicit Association Test). step 1

STEP 1

In this tutorial we will be adding an advanced Implicit Association Test to a Psychexp project.

Prior to attempting to use the advanced Implicit Association Test, you will need to fully understand the Psychexp basic Implicit Association Test.

If you have not already read the basic Implicit Association Test tutorial, please click the following link.

Build an advanced IAT (Implicit Association Test).

Please note, this advanced version of the Implicit Association Test offers extreme flexibility in regards to the structure of the project you create. Without a deep knowledge of the concept and workings of the Implicit Association Test, you will have difficulty understanding how to create the advanced test and how to analyze the data collected.

STEP 2

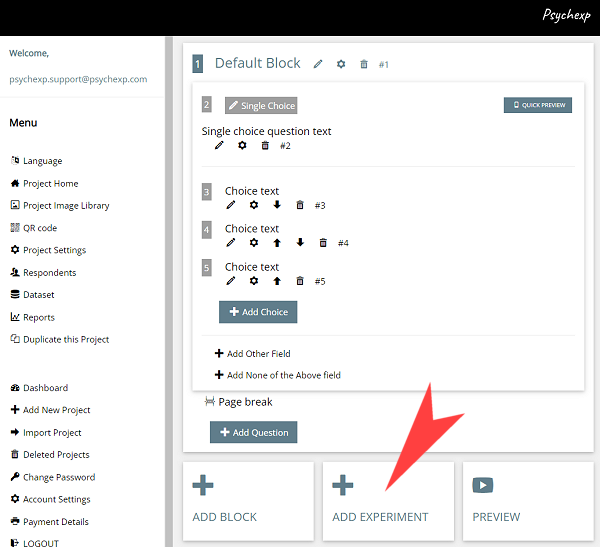
When you insert an Advanced Implicit Association Test into your project, the default experiment is identical to the basic Implicit Association Test. In other words if you do not change any of the settings, this experiment will perform exactly the same as the basic Implicit Association Test.

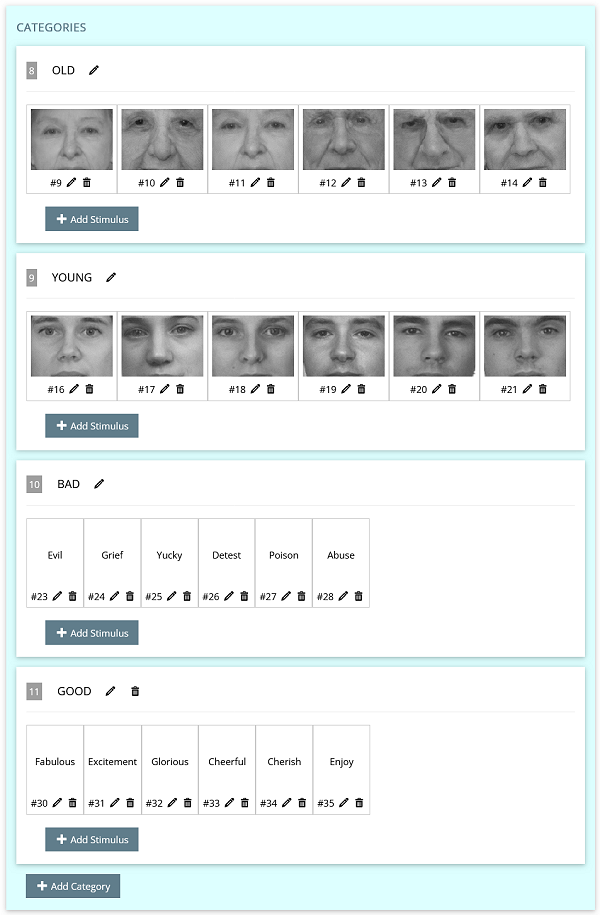
The advanced Implicit Association Test has three sections in the edit screen. The blue section contains the categories. You can create as many categories as you need and then add as many stimulus as you need to each category. The green section contains all the messages that will be displayed to the user during the experiment. All these messages are editable, and this makes it possible to change the experiment to any language you require. The pink section is the experiment flow where you select the categories to be shown in each block and also how many stimulus are shown from each category. The default experiment has seven blocks, but more can be added or deleted to suit your needs.

Build an advanced IAT (Implicit Association Test). step 2
Build an advanced IAT (Implicit Association Test).CATEGORIES

CATEGORIES

The default experiment has 4 categories, and each category contains six stimulus. You can edit any of these categories and the stimulus within them. You can also add more categories or add more stimulus to any category.

PRO TIP: Adding/deleting categories, or adding/deleting stimulus within a category will cause any flow settings (pink section) that are associated with the category you have changed to be reset to default. To save yourself time, make sure that you have completed all the neccessary changes to the categories section prior to making any changes in the flow section. IMPORTANT: It is strongly advised that you plan the categories, stimulus and flow of your IAT experiment on paper before attempting to create your project on the project edit page.

MESSAGES

All the messages that are shown throughout the experiment can be edited in this section. Any of the following key words written in all capitals (LSWITCH, LGROUP, RSWITCH, RGROUP) must not be deleted. The browser searches for these key words within each sentence and replaces them with the appropriate category name or keyboard letter when building the page.

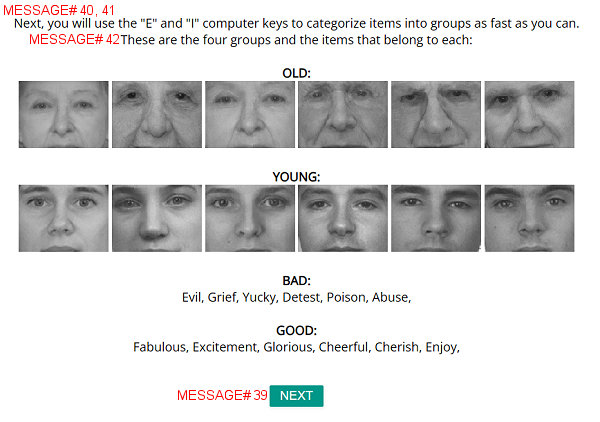
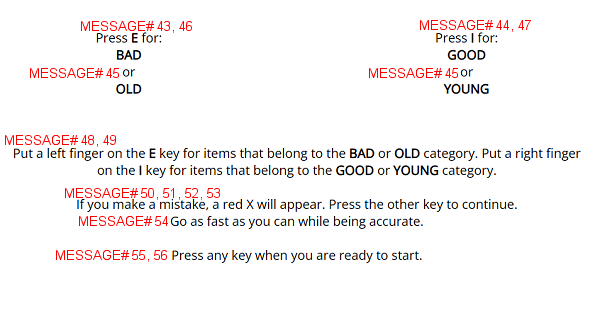
Please reference the following images to locate where each message will be displayed throughout the IAT experiment.

Build an advanced IAT (Implicit Association Test). MESSAGES

Build an advanced IAT (Implicit Association Test). MESSAGES
Build an advanced IAT (Implicit Association Test). IAT (Advanced) FLOW

IAT (Advanced) FLOW

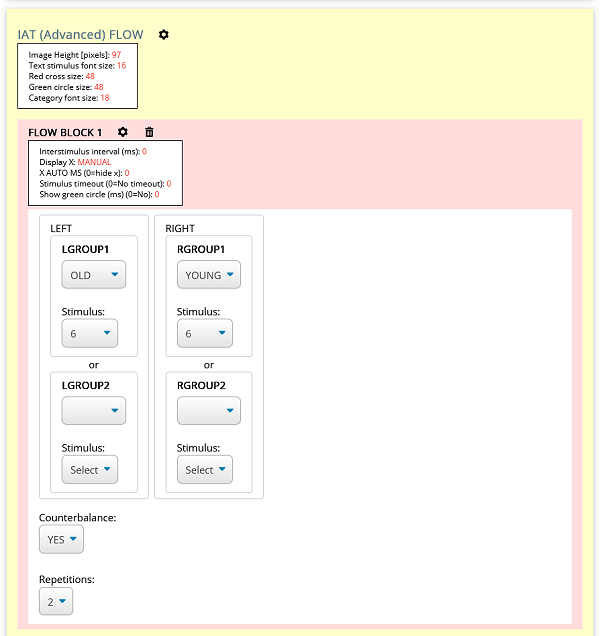
The flow section consists of flow blocks. The default experiment has seven flow blocks, however you can add or delete blocks to suit your needs.

Each flow block allows you to set the categories that will be dispayed on the left and right side of the experiment. You can also set the number of stimulus that will be included from each category. The same category should not be selected more than once within a single flow block. Please note that, it is possible to create a Single Category IAT experiment by selecting one category on one side and two categories on the other side of the flow block.

Once you have selected the categories and number of stimulus for each category within the flow block, select the number of repetitions you require. If you select 6 stimulus from both categories on the left and right, and select 2 repetitions, the 24 stimulus will be duplicated and shuffled (total = 48).

If you set counterbalance to YES, the categories will be flipped to the other side for half of the respondents. If only the top categories (LGROUP1/RGROUP1) are set and neither of the bottom categories are set, then the top categories will be flipped. If both or just one of the bottom categories (LGROUP2/RGROUP2) are set, the top categories stay as they are and just the bottom categories get flipped to the opposite side. Whether the counterbalance is distributed randomly or alternately, is decided by the "Randomized Combination" setting which can be found by clicking the cog icon on the experiment block.
Advanced IAT Settings

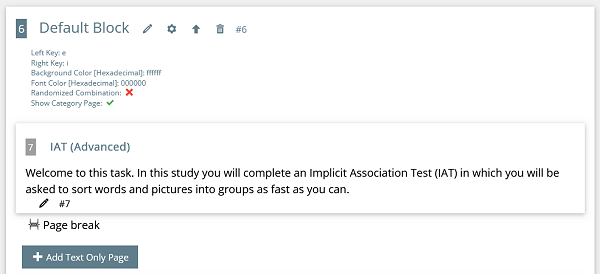
By clicking on the experiment block settings (cog) icon, you can make changes to the following settings of the experiment;

  • Left and right keyboard input key (Not applicable for tablet or smartphone participants)
  • Background Color [Hexadecimal]
  • Font Color [Hexadecimal]
  • Randomized Combination
    • NOTE: Selecting "Randomized Combination" forces the block order counterbalance to be decided randomly for each participant. If "Randomized Combination" is not selected the block order counterbalance is distributed alternately.
  • Show Category Page

By clicking on the IAT (Advanced) Flow settings (cog) icon, you can make changes to the following settings (affects all flow blocks);

  • Image Height [pixels]
  • Text stimulus font size
  • Red cross size
  • Green circle size
  • Category font size
    • Take care changing any of these settings. Increasing the size may cause the layout on smartphones to break.

By clicking on the Flow Block settings (cog) icon, you can make changes to the following settings;

  • Interstimulus interval (ms)
  • Display X
    • MANUAL: If the wrong answer is selected, the respondent must click the opposite key/button (correct answer) to continue.
    • AUTO: If the wrong answer is selected, the respondent does not need to click the opposite key/button (correct answer). In this case, what happens next will be determined by the X AUTO MS setting.
  • X AUTO MS (0=hide x)
    • ZERO: If the wrong answer is selected, the red X is not shown. The next stimulus will automatically be shown in accordance with the interstimulus interval setting.
    • (N): If the wrong answer is selected, the red X is shown for (N) milliseconds, then the next stimulus will automatically be shown in accordance with the interstimulus interval setting. The X AUTO MS and interstimulus interval timing both start when the wrong answer is selected, so if the interstimulus interval is set, the X AUTO MS (N) value must not be a value higher than the interstimulus interval value.
  • Stimulus timeout (0=No timeout)
    • If this value is set and the respondent does not select an answer within (N) milliseconds, the next stimulus will be shown. NOTE: The red X is not shown after the stimulus timeout, however if the Interstimulus interval is set, the next stimulus will be shown after the interstimulus interval.
  • Show green circle (ms) (0=No)
    • If the correct answer is selected, a green circle is displayed for (N) milliseconds. The green circle and interstimulus interval timing both start when the correct answer is selected, so if the interstimulus interval is set, the Show green circle (N) value must not be a value higher than the interstimulus interval value.
Build an advanced IAT (Implicit Association Test). Advanced IAT Settings