English

日本語

PSYCHEXP
TUTORIAL

Class Admin - Class Credits System - Room Booking System - Group Admin - Portfolio Admin - lesson Admin
Psychexp for Education
overview 1

OVERVIEW

In this tutorial we will be taking a look at the four additional functions that are included in the PSYCHEXP for Education plan:

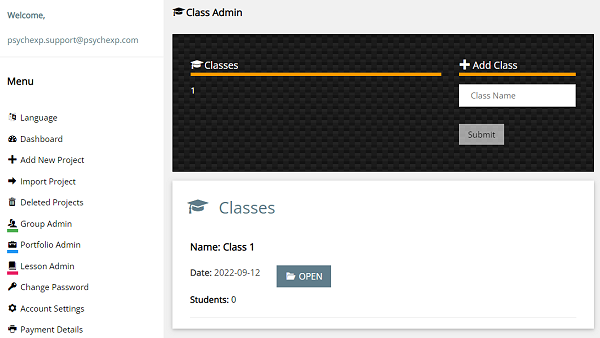
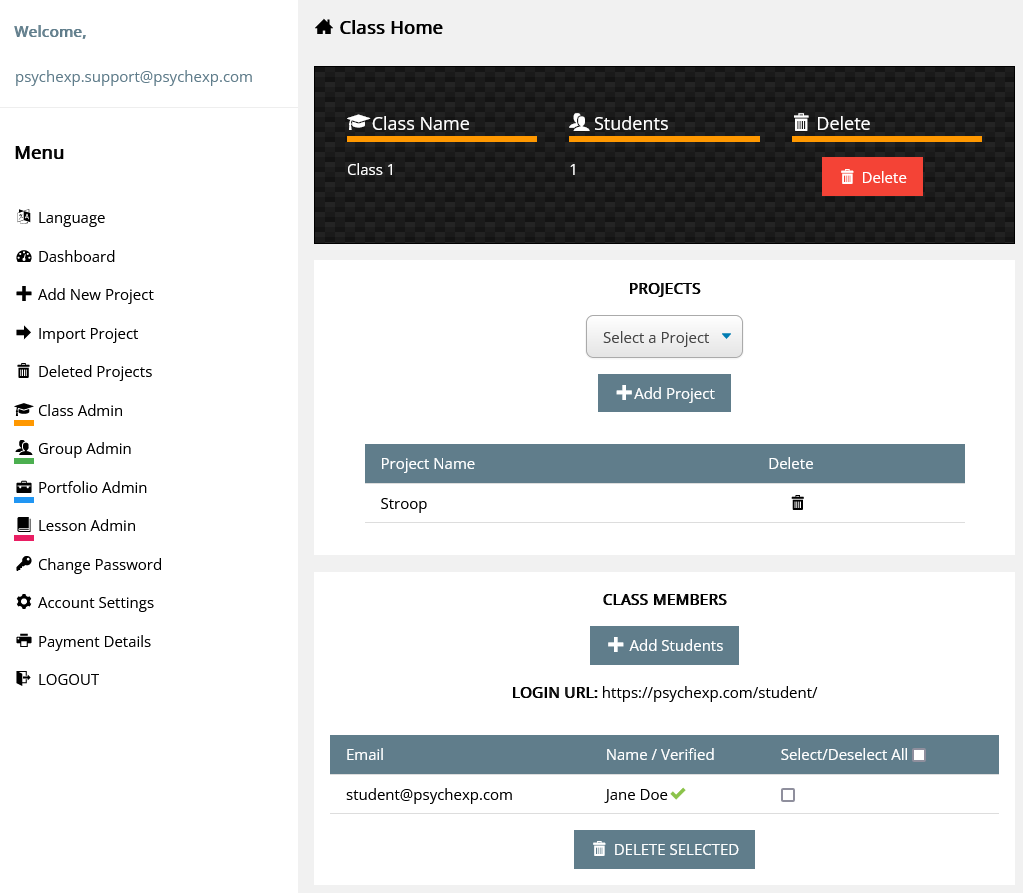
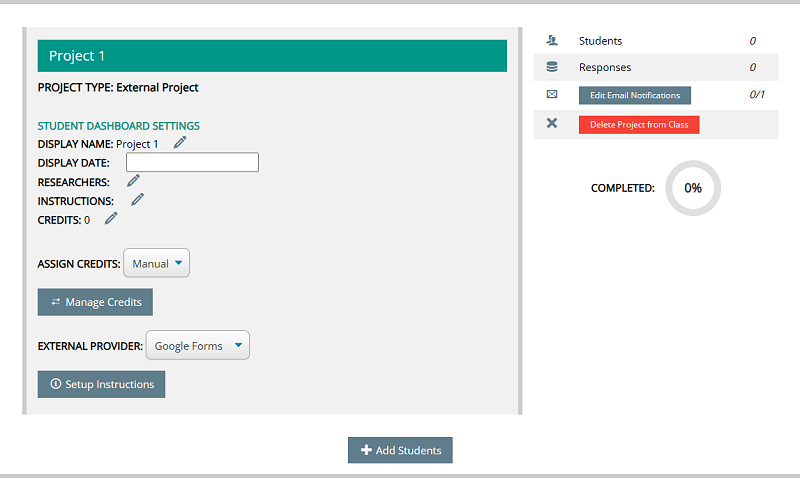
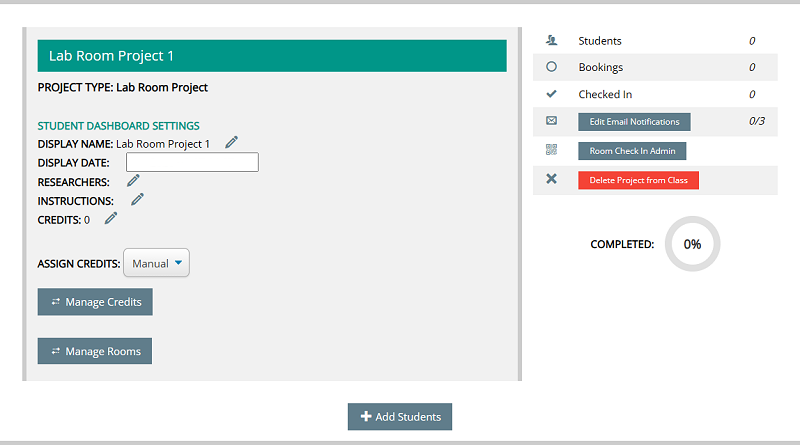
CLASS ADMIN: Class admin is where you assign students to complete the surveys, experiments, lessons and portfolios you have created in Psychexp. You can also assign students to complete surveys you have created externally in Google Forms, Qualtrics or Survey Monkey.
Class admin is also where you access the Lab Room Booking System, and Course Credit system.

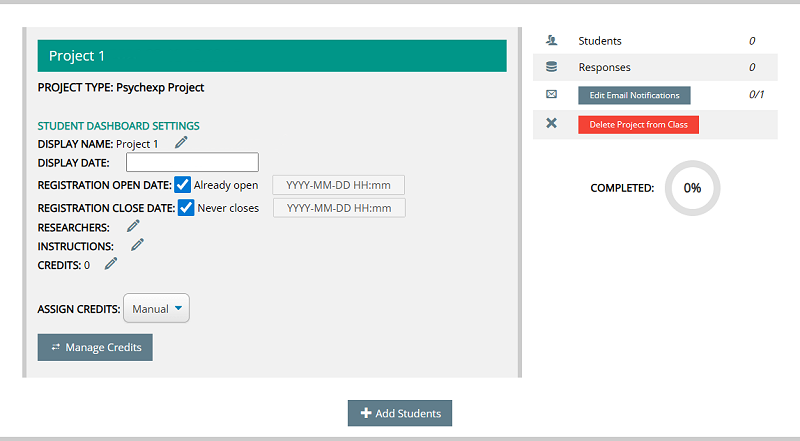
  • CLASS CREDITS SYSTEM: You can assign class credits to surveys, experiments, lessons and portfolios that you register in class admin. Credits can be awarded manually or automatically when the student completes the task.
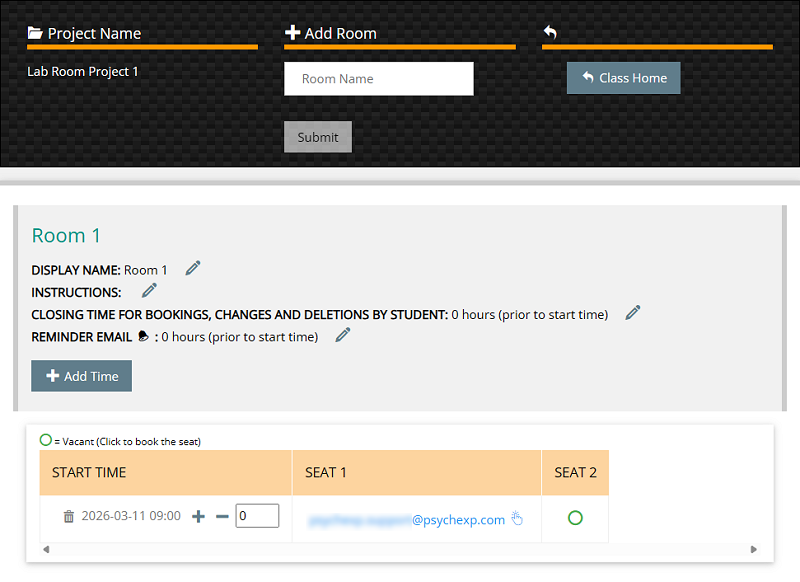
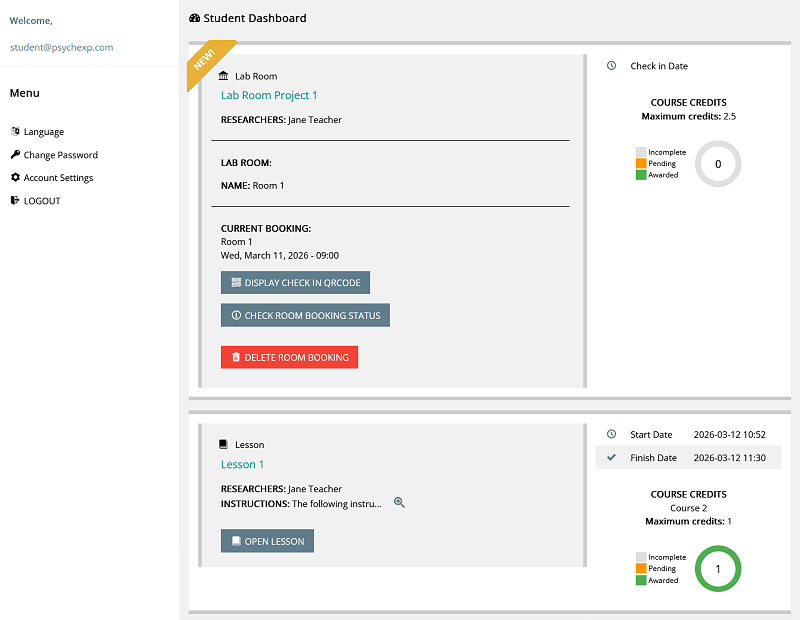
    Course Credits can be assigned either on the completion of a single task or the completion of a group of multiple tasks.
  • ROOM BOOKING SYSTEM: After creating a Lab Room Project in class admin you can add unlimited rooms and time slots to the project. The students you assign to the project can then book a room and time slot from their student dashboard.
    The Room Booking System includes room booking reminder email notifications to the student, and also includes a qrcode room check in system.

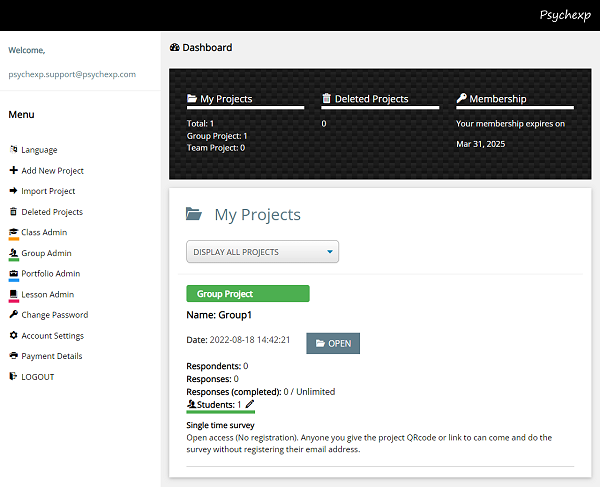
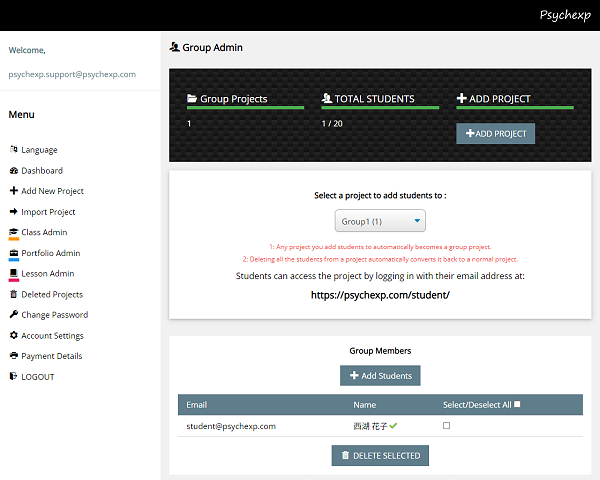
GROUP ADMIN: Create a survey or experiment and invite a student to collaborate on the project from their student dashboard.

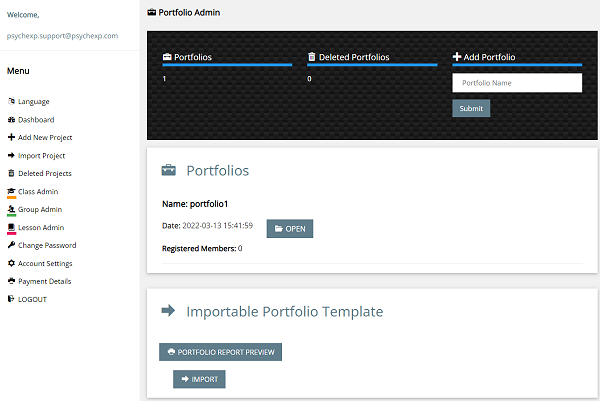
PORTFOLIO ADMIN: Build a learning portfolio to help your students self-evaluate and reflect on their own learning outcomes. Each student can access the portfolio from their student dashboard.

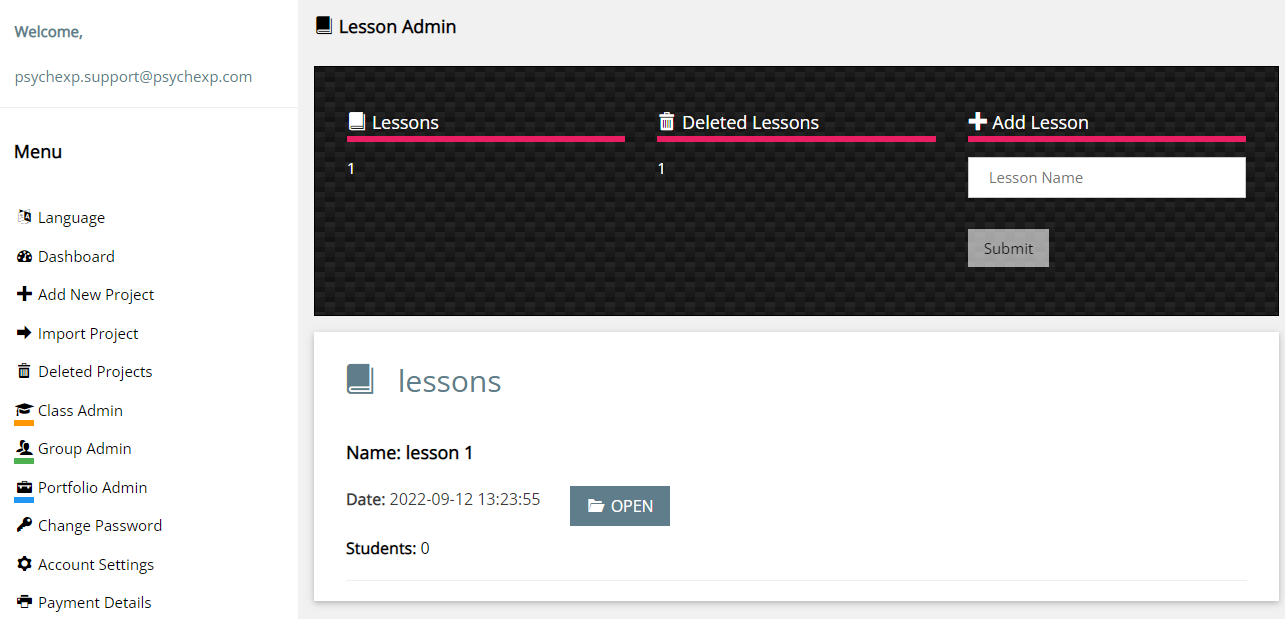
LESSON ADMIN: In lesson admin you are able to create an online lesson (e-book) that includes quiz question functionality.

STUDENT DASHBOARD: Projects you assign to your students are all accessible from the student dashboard. Just one simple URL !!

CLASS ADMIN 1

To create a new class, enter the class name and click "SUBMIT".

Once you have created the class, click on OPEN to go to the class home screen.

 PRO TIP:
Create one class for each new semester.
Class Admin 1
Class Admin 2

CLASS ADMIN 2

On the class home screen, you can add a Psychexp project, lesson or portfolio, or you can add an external Google Forms, Qualtrics or Survey Monkey project. The class home screen is also where you can create a Lab Room Project and have your students make a booking for the Lab Room from their student dashboard.

Add Psychexp Project: From the dropdown list select a project from your dashboard, a lesson from Lesson Admin or a portfolio from Portfolio Admin. You can then assign students to this task, and the students will be able to access the task from their student dashboard.

Add External Project: Enter a name for a project you have created externally in either Google Forms, Qualtrics or Survey Monkey. You can then assign students to this task, and the students will be able to access the task from their student dashboard.

Add Lab Room Project: Enter a name for your Lab Room Project. You can then assign students to this Lab Room Project, and the students will be able to access it from their student dashboard and make a booking for the Lab Room.

Group with: In the "Group with" dropdown list you can select a task that you have already added to this class. The task you are creating will then be grouped together with the task you select from the "Group with" dropdown. When you group multiple tasks together in a group the credits you assign will be awarded for completing all the tasks in the group. For example if you have two tasks in a group and you assign 3 credits to the group, the credits will be awarded when the student completes both of the tasks.

Add Course Name: You can assign course credits to any task or group of tasks and the credits will be rewarded to a student when they complete the task. When you assign course credits to a task you will be required to stipulate which course the credits will be applied against. You can add as many course names as you require.

CLASS ADMIN 3

Psychexp Project

  • DISPLAY NAME: Change this to the name you wish to be displayed on the student dashboard for this task.
  • DISPLAY DATE: Change this to the date from which you wish for this task to be displayed on the student dashboard.
  • REGISTRATION OPEN DATE: This is the date from which registrations for this task can begin. CAUTION: This changes the date on the "Project Settings" page of this project. If you are using this project in multiple classes or are using the project as an independent survey/experiment, all instances of the project will be affected by this change.
  • REGISTRATION CLOSE DATE: This is the date when registrations for this task will close. CAUTION: Please refer to the "Registration open date" caution above.
  • RESEARCHERS: Enter the name of the researchers related to this task. This will be displayed in this task on the student dashboard.
  • INSTRUCTIONS: Enter any instructions you have for the student in relation to this task. This will be displayed in this task on the student dashboard.
  • CREDITS: Enter the number of credits you would like to award for this task and select the course that you would like to apply the credits to. Both the number of credits and the course that the credits will be applied against will be displayed in this task on the student dashboard.
  • ASSIGN CREDITS: If you select "Auto", credits will automatically be assigned to the student when they complete the task, or in the case of a lesson or portfolio, when they click the "Apply for Course Credits" button displayed at the end of the lesson or portfolio. If you select "Manual", you assign the credits to the student yourself in the "Manage Credits" section. The "Manage Credits" section allows you to check the data from each students task prior to deciding if you wish to assign them full or partial credits.
  • EDIT EMAIL NOTIFICATIONS: You can turn on or turn off email notifications for the task at any time. When you create a task all email notifications are turned off by default.
  • ADD STUDENTS: You can add as many students to the task as you require, simply by entering their email address. Any students you add to this task will see the task (In accordance with the above settings) when they log in to their student dashboard.
PRO TIP: If you would like to check what the project looks like in the Student Dasboard, add your own email address by clicking on the "Add Students Button", and then log in as a student. You cannot be logged in to your Psychexp account and the Student Dashboard at the same time on the same browser, so either log out first or use a seperate browser. If you do not see your project in the Student Dashboard, check the date set on the "Display Date" field on the "Class Home" page.
Class Admin 3
Class Admin 4

CLASS ADMIN 4

External Project

  • DISPLAY NAME: Change this to the name you wish to be displayed on the student dashboard for this task.
  • DISPLAY DATE: Change this to the date from which you wish for this task to be displayed on the student dashboard.
  • RESEARCHERS: Enter the name of the researchers related to this task. This will be displayed in this task on the student dashboard.
  • INSTRUCTIONS: Enter any instructions you have for the student in relation to this task. This will be displayed in this task on the student dashboard.
  • CREDITS: Enter the number of credits you would like to award for this task and select the course that you would like to apply the credits to. Both the number of credits and the course that the credits will be applied against will be displayed in this task on the student dashboard.
  • ASSIGN CREDITS: If you select "Auto", credits will automatically be assigned to the student when they complete the task, or in the case of a lesson or portfolio, when they click the "Apply for Course Credits" button displayed at the end of the lesson or portfolio. If you select "Manual", you assign the credits to the student yourself in the "Manage Credits" section. The "Manage Credits" section allows you to check the data from each students task prior to deciding if you wish to assign them full or partial credits.
  • EXTERNAL PROVIDER: Select the name of the external provider that you used to create your project from the list. Clicking the "Setup Instructions" button will display a detailed explanation of how to connect that project to Psychexp. For Qualtrics and Survey Monkey projects, when the student clicks the task in their student dashboard, the project opens in their current browser window and when they complete the project they will be returned to the Psychexp Student Dashboard. If you have selected to assign credits automatically to the task, the credits will immediately be displayed. For a Google Forms project, the project will open in a seperate tab in their browser. When using Google Forms if you choose to assign credits automatically to the task, the student will need to go back to their Psychexp Student Dashboard tab in their browser and manually refresh the page to see that the credits have been assigned.
  • EDIT EMAIL NOTIFICATIONS: You can turn on or turn off email notifications for the task at any time. When you create a task all email notifications are turned off by default.
  • ADD STUDENTS: You can add as many students to the task as you require, simply by entering their email address. Any students you add to this task will see the task (In accordance with the above settings) when they log in to their student dashboard.
PRO TIP: If you would like to check what the project looks like in the Student Dasboard, add your own email address by clicking on the "Add Students Button", and then log in as a student. You cannot be logged in to your Psychexp account and the Student Dashboard at the same time on the same browser, so either log out first or use a seperate browser. If you do not see your project in the Student Dashboard, check the date set on the "Display Date" field on the "Class Home" page.

CLASS ADMIN 5

Lab Room Project

  • DISPLAY NAME: Change this to the name you wish to be displayed on the student dashboard for this task.
  • DISPLAY DATE: Change this to the date from which you wish for this task to be displayed on the student dashboard.
  • RESEARCHERS: Enter the name of the researchers related to this task. This will be displayed in this task on the student dashboard.
  • INSTRUCTIONS: Enter any instructions you have for the student in relation to this task. This will be displayed in this task on the student dashboard.
  • CREDITS: Enter the number of credits you would like to award for this task and select the course that you would like to apply the credits to. Both the number of credits and the course that the credits will be applied against will be displayed in this task on the student dashboard.
  • ASSIGN CREDITS: If you select "Auto", credits will automatically be assigned to the student when they have their room booking qrcode scanned by the lab room check in assistant. If you select "Manual", you assign the credits to the student yourself in the "Manage Credits" section.
  • EDIT EMAIL NOTIFICATIONS: You can turn on or turn off email notifications for the task at any time. When you create a task all email notifications are turned off by default.
  • ROOM CHECK IN ADMIN: You can create multiple Check In Assistants by simply adding their email address. A unique registration URL will be created which you can then supply to them. When they open the URL in the browser on their mobile device, it will register their browser and they will then be authorized to scan the qrcodes of students booked in to the Lab Room.
  • ADD STUDENTS: You can add as many students to the task as you require, simply by entering their email address. Any students you add to this task will see the task (In accordance with the above settings) when they log in to their student dashboard.
PRO TIP: If you would like to check what the project looks like in the Student Dasboard, add your own email address by clicking on the "Add Students Button", and then log in as a student. You cannot be logged in to your Psychexp account and the Student Dashboard at the same time on the same browser, so either log out first or use a seperate browser. If you do not see your project in the Student Dashboard, check the date set on the "Display Date" field on the "Class Home" page.
Class Admin 5
Class Admin 6

CLASS ADMIN 6

Manage Rooms

  • ADD ROOM: You can add as many rooms as required to the Lab Room Project.
  • DISPLAY NAME: Change this to the room name you wish to be displayed on the student dashboard for this Lab Room Project.
  • INSTRUCTIONS: Enter any instructions you have for the student in relation to this room. This will be displayed in this Lab Room Project on the student dashboard.
  • CLOSING TIME FOR BOOKINGS, CHANGES AND DELETIONS BY STUDENT: If this is set to zero, the students will be able to make, change or delete bookings right up until the room start time. If you set this to a value other than zero, it will only apply to the bookings made from the Student Dashboard. You will still be able to make, change or delete a booking yourself for a student up until the room start time by clicking on the booking (email address of the student) in "Manage Rooms".
  • REMINDER EMAIL: If you set this to zero no reminder emails will be sent. Entering a value will create an email reminder for all students that have already booked in to the room and also any bookings that are made after you set this field. If you set this field back to zero at any time, all reminder emails that have been created but not yet sent will be deleted (not sent).
  • ADD TIME: You can add multiple start times to the room on the same day or on seperate days. Example: 9:00, 10:00, 13:30
  • Enter a number in the field and then click plus or minus to add or subtract seats to the room. You can only remove a seat if it is not booked.
  • A circle represent a seat that is not yet booked. If a seat is booked the email address is shown. Clicking on either will allow you to make, change or delete a booking. When you make, change or delete bookings an email notification is sent to the owner of the booking, advising them of what the booking administrator has done. (This email notification cannot be turned off.)

Group Admin 1

In group admin you are able to invite students to work together with you on the building of any project that you have created. Students you add to the project in the group admin section will automatically have access to the project by logging in to their student dashboard.

Any project you add students to automatically becomes a group project and displays a green "Group Project" banner in the list of projects displayed on the "Dashboard" page. Deleting all the students from the group project automatically converts the project back to a standard project and the green "Group Project" banner will no longer appear.

Group Admin 1
Group Admin 2

Group Admin 2

You can add students to any project you have already created, or if you would like to create a new project to add students to, firstly click the "Add project" button which will take you to the "Add New Project" page. Once you have created the project return to the "Group Admin" page, select the project you created from the dropdown list and then add one or more students.

In order to add students to your project click on the “Add Students” button and enter the email address of your students.

The students you add can now access the project at any time by logging in to the student dashboard using the email address you added.

Your students can access and edit all aspects of the project in the same way as you can, however they do not have access to the duplicate project function page.

In order to access the project yourself, go to the dashboard, find the project in the list and click on the "OPEN" button.

A group admin project is edited in the same way a standard project is edited, by clicking the “EDIT PROJECT” button. For guidance on how to edit a project please refer to our “Getting Started Tutorial”.

PRO TIP: Group Admin is for registering students to collaborate on your project and the students access the project from the student dashboard. If you would like another Psychexp user to collaborate on a project with you, use the "Team Members" function which can be found on the "Settings" page of any project. Team Members can access the project from the dashboard of their Psychexp account. Please note, the same project can have both students from the group admin page and team members from the settings page registered to collaborate on the project. For guidance on how to add Team Members to a project please refer to our “Getting Started Tutorial”.

Portfolio Admin 1

In portfolio admin you are able to create a learning portfolio to help your students self-evaluate and reflect on their own learning outcomes.

To create a new learning portfolio, enter the portfolio name and click "SUBMIT".

Alternatively, you can click on the import button to import the learning portfolio template and then modify it to suit your needs. The standard template consists of a self-assessment based on a rubric (evaluation criteria chart) and includes comment fields for the student to record the reasons for their assessment.

Once you have created the learning portfolio, click on OPEN to go to the portfolio home screen.

You can edit the portfolio by clicking the “EDIT PORTFOLIO” button. For guidance on how to edit a project please refer to our “Getting Started Tutorial”.

In order to assign students to your portfolio, once you have created it go to "Class Admin", open a class and then add your portfolio to a task by selecting the portfolio from the dropdown list in the "Add Psychexp Project" section. You can then add students to the task so that they can complete the portfolio from the link that will be displayed on their Student Dashboard. Please note that once you add your portfolio to a task, you can then also award course credits to the student for completing the portfolio.

portfolio admin 1
lesson admin 1

lesson Admin 1

In lesson admin you are able to create an online lesson (e-book) that includes quiz question functionality. The quiz questions can be set to either practice or test mode. In practice mode the questions can be practiced by the student multiple times. In test mode the questions can only be answered once and the data is recorded to the lesson's dataset.

To create a new online lesson (e-book), enter the lesson name and click "SUBMIT".

Once you have created the lesson, click on OPEN to go to the lesson home screen.

You can edit the lesson by clicking the “EDIT LESSON” button. For guidance on how to edit a lesson please refer to our “How to Build a Lesson (e-book)” tutorial.

In order to assign students to your lesson, once you have created it go to "Class Admin", open a class and then add your lesson to a task by selecting the lesson from the dropdown list in the "Add Psychexp Project" section. You can then add students to the task so that they can complete the lesson from the link that will be displayed on their Student Dashboard. Please note that once you add your lesson to a task, you can then also award course credits to the student for completing the lesson.